Before I begin I do want to let visitors know about my Facebook page titled "F 16 - Photography by Tom Wagner".
I created it with a table of contents and links to my many photo albums depicting a wide range of subjects.
I created it with a table of contents and links to my many photo albums depicting a wide range of subjects.
This winter (14-15) is the first time I have photographed the birefringence of ice (see the picture above). In fact, I didn't actually know that ice is birefringent until I discovered that it was. I've taken really cool pictures of the birefringence of naphthalene crystals (moth ice) but not water ice. I wanted to improve upon the look of ice crystals in frozen bubbles and I wondered if they were birefringent. To see this phenomenon you only need a simple pair of Polaroid filters. So, I grabbed my from the theater "RealD 3D" glasses - they contain two excellent Polarizers. However, I was disappointed to find that the bubble crystals were far too thin to produce the color I was hoping for. But, not to be deterred, I wondered if frost on a window might work. Not having any frost at the moment I dribbled a little water on a piece of glass and wow! Crystals that were around 1 mm thick were fabulously colored and with incredible intricate designs !!
After a two months of of very uncomfortable work in my cold garage I developed a set-up and technique that enables me to capture fantastic high magnification, high resolution images of - really nothing more than ordinary ice crystals between sheets of glass with a polarizing filter on each side.
I take the pictures using my old 100 mm Pentax macro lens mounted in reverse on a bellows. Reversing the macro helps make the picture better when taking images larger than life. The added bellows extension magnifies the image considerably.
The Light source is an old beat up Vivitar 283 flash that I inherited as a nonworking piece of junk. I hacked into the circuitry to make it adjustable in a manual mode. I can vary the power continuously from full-on down to much less than that. The flash blasts its light through a hole in the side of a white 5-gallon bucket lined with white paper, on top of which is a lid with a 4-inch hole in the center. Over the hole I mounted a piece of plastic that can be easily leveled to perfectly match the plane of the front of the lens. A framed sheet of Polaroid material on the plastic but under a sheet of window glass the same size as the paper frame creates polarized light that passes through the subject matter. The rear (bottom) of the lens is covered by an adjustable polarizing filter attached to a drilled-out rear lens cap.
Most often the ice was frozen between two relatively small sheets of window glass I cut to a "that-looks-good" size but the highest resolution pictures were taken with the ice crystallized within some old fashioned 2 x 2 inch glass mount slides I inherited from my dear high school chemistry teacher, who was the first to teach me about SLR photography. At first I photographed the ice directly on one piece of glass with nothing on top of it. The very best high resolution images were created by "focus stacking" in Photoshop. Focus stacking increases the depth of field when using apertures like f 5.6 for critical sharpness.
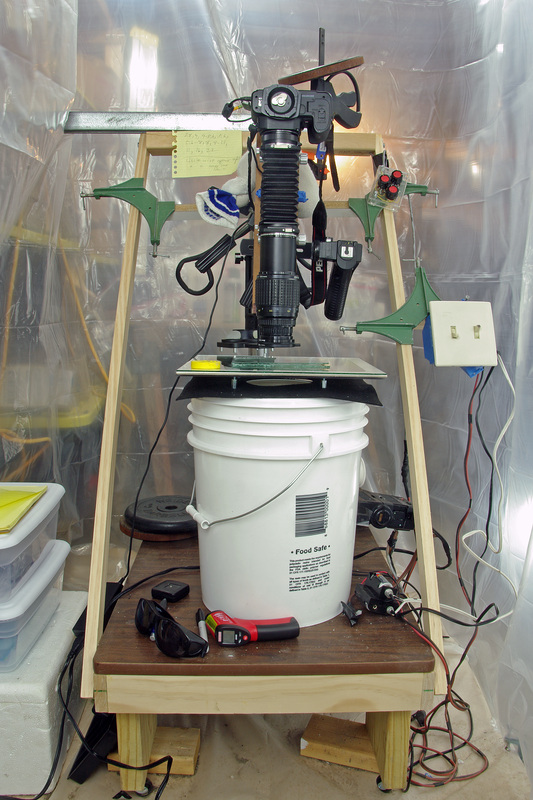
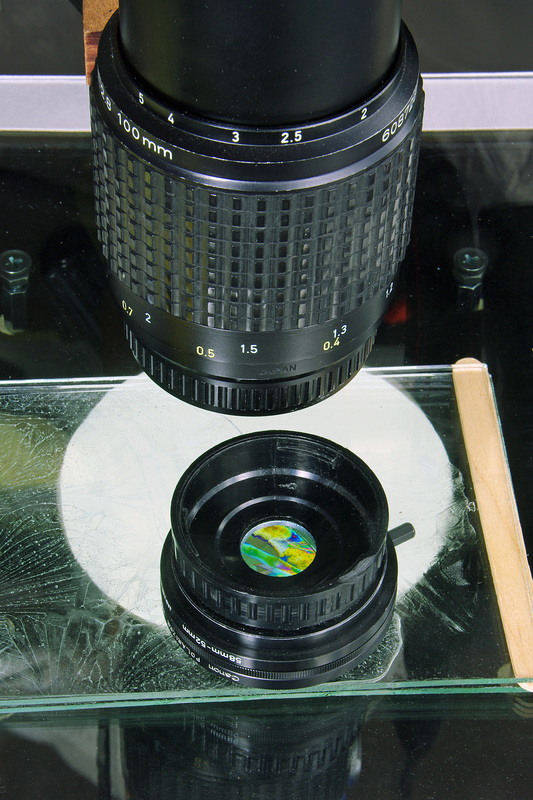
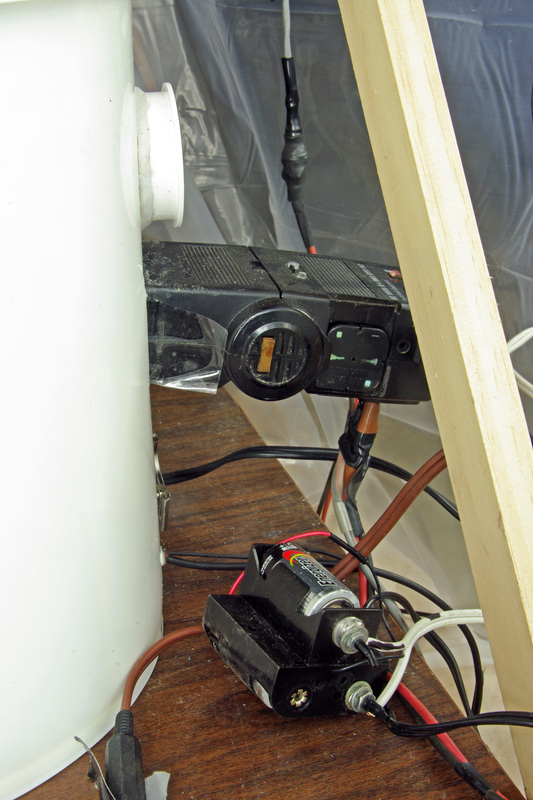
Below are three pictures that can be expanded when clicked upon. The left image shows how I set up my camera and so on in a plastic tarp tent in my very dusty unheated garage. Notice the heavily braced copy stand and the white bucket etc. I use the switches to control the LED modeling light inside the bucket and to discharge the flash manually during a time exposure. The middle picture is a close-up of the 100 mm macro lens, the polarizing filter and the drilled out rear lens cap. They are detached in the image and are setting on some birefringent ice. Notice the colors! The picture on the right shows the old Vivitar 283 flash with the wires I use to set it off and control its light duration. The battery pack is for the LED in the bucket.
After a two months of of very uncomfortable work in my cold garage I developed a set-up and technique that enables me to capture fantastic high magnification, high resolution images of - really nothing more than ordinary ice crystals between sheets of glass with a polarizing filter on each side.
I take the pictures using my old 100 mm Pentax macro lens mounted in reverse on a bellows. Reversing the macro helps make the picture better when taking images larger than life. The added bellows extension magnifies the image considerably.
The Light source is an old beat up Vivitar 283 flash that I inherited as a nonworking piece of junk. I hacked into the circuitry to make it adjustable in a manual mode. I can vary the power continuously from full-on down to much less than that. The flash blasts its light through a hole in the side of a white 5-gallon bucket lined with white paper, on top of which is a lid with a 4-inch hole in the center. Over the hole I mounted a piece of plastic that can be easily leveled to perfectly match the plane of the front of the lens. A framed sheet of Polaroid material on the plastic but under a sheet of window glass the same size as the paper frame creates polarized light that passes through the subject matter. The rear (bottom) of the lens is covered by an adjustable polarizing filter attached to a drilled-out rear lens cap.
Most often the ice was frozen between two relatively small sheets of window glass I cut to a "that-looks-good" size but the highest resolution pictures were taken with the ice crystallized within some old fashioned 2 x 2 inch glass mount slides I inherited from my dear high school chemistry teacher, who was the first to teach me about SLR photography. At first I photographed the ice directly on one piece of glass with nothing on top of it. The very best high resolution images were created by "focus stacking" in Photoshop. Focus stacking increases the depth of field when using apertures like f 5.6 for critical sharpness.
Below are three pictures that can be expanded when clicked upon. The left image shows how I set up my camera and so on in a plastic tarp tent in my very dusty unheated garage. Notice the heavily braced copy stand and the white bucket etc. I use the switches to control the LED modeling light inside the bucket and to discharge the flash manually during a time exposure. The middle picture is a close-up of the 100 mm macro lens, the polarizing filter and the drilled out rear lens cap. They are detached in the image and are setting on some birefringent ice. Notice the colors! The picture on the right shows the old Vivitar 283 flash with the wires I use to set it off and control its light duration. The battery pack is for the LED in the bucket.