Background information
Click HERE to go directly to the gallery of cell phone images or HERE to see the high resolution images I captured using my digital SLR.
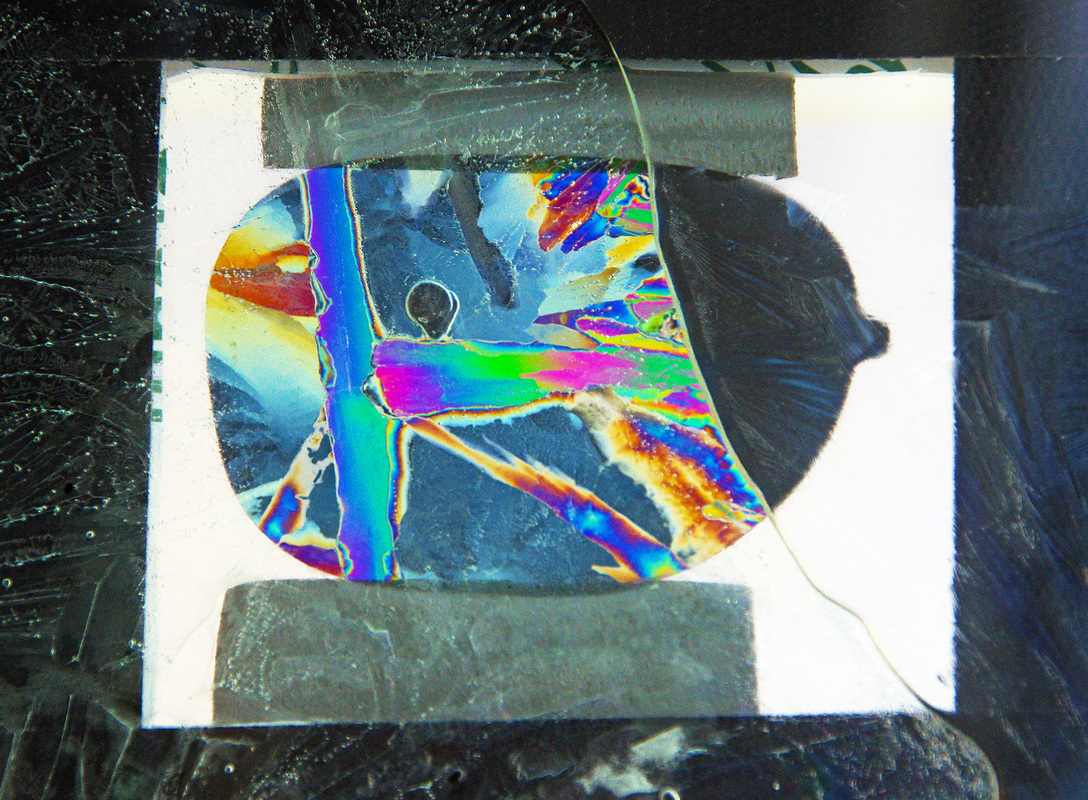
One day as I was freezing my butt off one night out in my cold garage taking super close-up pictures of snowflakes I thought about how I might improve on my pictures of frozen bubbles. Sometimes I’d see some iridescence in the feather-like crystals which led me to think that maybe the color might be enhanced by birefringence. If so two polarizing filters - one in front and one behind the bubble - might create brighter colors. I tried it and ..... nothing. No extra color at all. Nuts. Apparently the crystals are too thin. But I wondered if frost on a window might be thicker and thus work. So I dribbled a little water on glass and, low and behold, what I saw then was magnificent! Even though frost was still too thin a thicker - 1 mm or so - layer of crystallized water IS birefringent!! REALLY BIREFRINGENT! The colors and patterns can be fantastic! And it turns out it's easy to create a set-up to observe it and photograph it using a cell phone camera.
Birefringence is a fancy word used to describe a phenomenon that is made visible when a birefringent material is placed between two polarizing filters – especially when the filters are “crossed” so that essentially no light gets through, except for certain wavelengths that are interfered with by the birefringent material. And ice – when in the range of a certain thickness – does a great job of interfering with the light, I discovered. Of does it ever! The thickness and orientation of the ice crystals and the degree to which the two polarizers are crossed play into what colors get through to the observer.
I already had been using a set-up for taking pictures of snowflakes using back-lighting, and I tried using it to capture the colors of birefringence of ice. It worked spectacularly well! Then I worked out a simple way to take great pictures with my cell phone.
However, to create really high resolution pictures at high magnification, I worked out a technique over a two month period. Trust me, I froze half to death this winter. On this particular website I start out with the cell phone images then I show off the best stuff I took using a macro lens and high magnification.
So, I did the 'figuring out' part for you all. Making the ice crystals is easy, just use the freezer part of your refrigerator -or- if it’s as cold there as it has been here in Iowa this winter, simply place your thin layer of water outside for a bit.
-------------------------------------------------------------------------
How to Guide
Now for the info about how you can take pictures of birefringent ice with a cell phone.
Materials I used
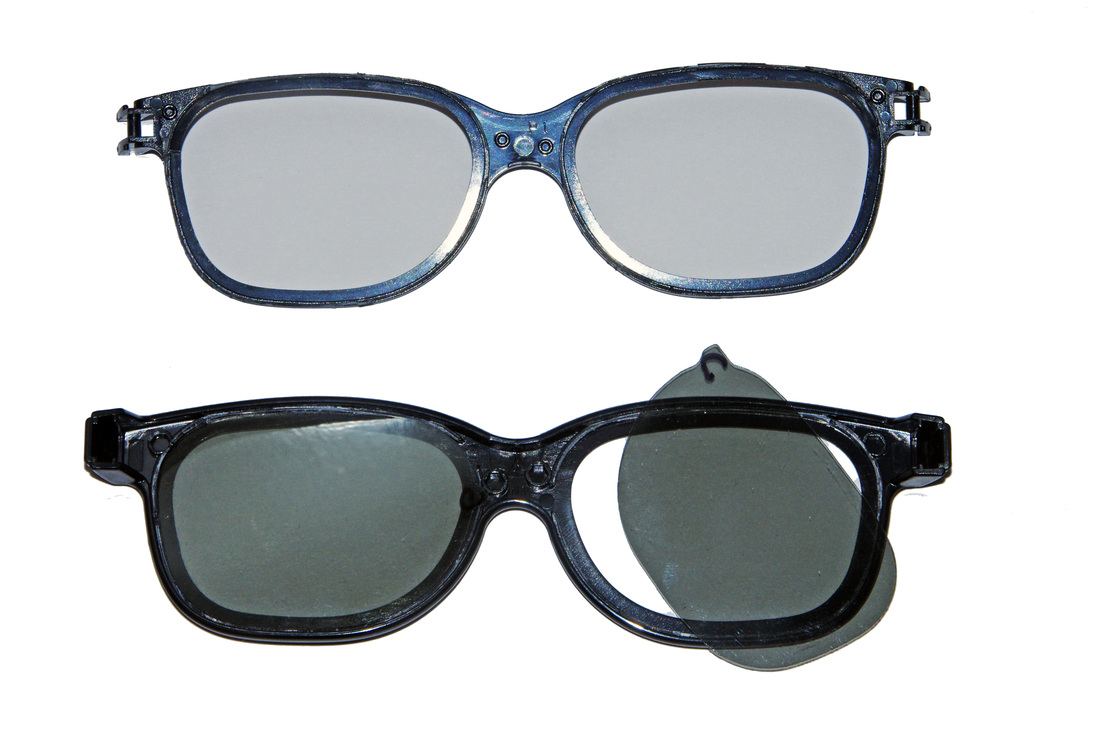
1. Two polarizing filters: the ones I used were taken from a pair of RealD 3D glasses that I opted not to recycle after watching a 3D movie at the theater.
2. One bottle of drinking water. Actually even tap water or snow will work.
3. One removable black cap from a spray can of some sort. It should be a cap that is simple and completely hollow.
4. Optional: one a metal washer with about a half inch hole in the center.
5. Duct tape, preferably black.
6. One razor blade and an Exacto knife.
7. Window glass. Pairs of pieces around 3 x 5 inches, or larger, depending upon your "light box" design. One piece of glass will fit into or onto the lid of a gallon ice cream container.
8. One white one-gallon ice cream bucket. I used a square one.
9. One bottle of ordinary window cleaner.
10. One bottle of 91% rubbing alcohol.
11. One roll of paper towels.
12. One microfiber cloth – or some other material that will not leave fibers behind.
13. One sharpie type permanent marker.
14. Optional: a Dremel tool that can be used to make a hole in the black can cap or a flame that will heat the Exacto blade enough to melt through the plastic.
15. One hair dryer or better yet, a heat gun.
16. A few sheets of white paper; any weight.
17. One empty aluminum soda/pop can.
18. One black cloth or coat that you can cover yourself with to make it possible to see the phone screen in bright light.
19. A day outside that is below freezing. A refrigerator freezer will harden the ice but unless it’s a floor model big enough to take pictures down inside of it, you will probably have to wait to winter to do this. I suppose dry ice could be used to create enough cold even in the warm months.
-------------------------------------------------------------------------
Instructions: this is what I did to set up for the cell phone images
1. First of all if I wanted water with few bubbles I froze the water and later melted the relatively bubble free outer part of the bottle of ice to get the little bit of airless water I needed. As the ice freezes the air is mostly released in the last part to freeze, i.e. in the inner part. I found boiling to be ineffective at removing the air.
2. Now disassemble a pair of RealD 3D glasses – the modern polarizing type that are used in the theaters. (See picture 1 in the gallery below) You will want to keep track of which side of each filter is on the inside. Maybe stick a small piece of tape onto or somehow mark the edge of the inside of each filter. Free the “lenses” by snapping off the bows then twisting the frame at the middle. In this way you can pry the frame apart without crimping the filters. Set the filters aside for now.
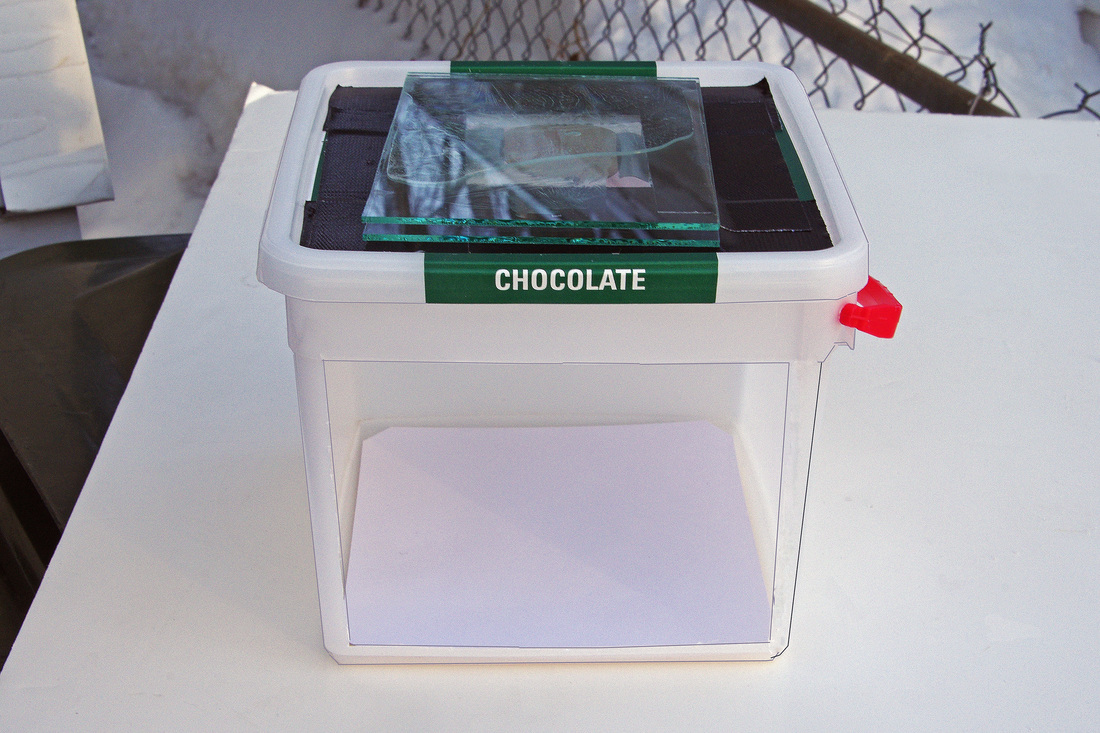
3. Construct the “light chamber” by using the one-gallon ice cream bucket. It will provide a diffused white light to shine through the ice crystals. (Picture 2) [NOTE! At this point, in green font, my instructions do not exactly follow the light bucket design I actually used and took pictures of for this webpage. What I’m telling you to do now is a better design that my first one.]
4. In the center of the lid of the ice cream bucket, mark out then cut a hole that is a about an inch on all sides larger than one of the 3D glasses filters. (Picture 2)
5. Cut a piece of glass so that the corners of the glass extend to the edge of the lid. If the sharp corners are exposed, tape them off. Also cut several pairs of smaller pieces that you will form ice between. Make them 3 x 5 inches or so. Clean all the pieces of glass with window cleaner, paper towels and finally, a microfiber cloth.
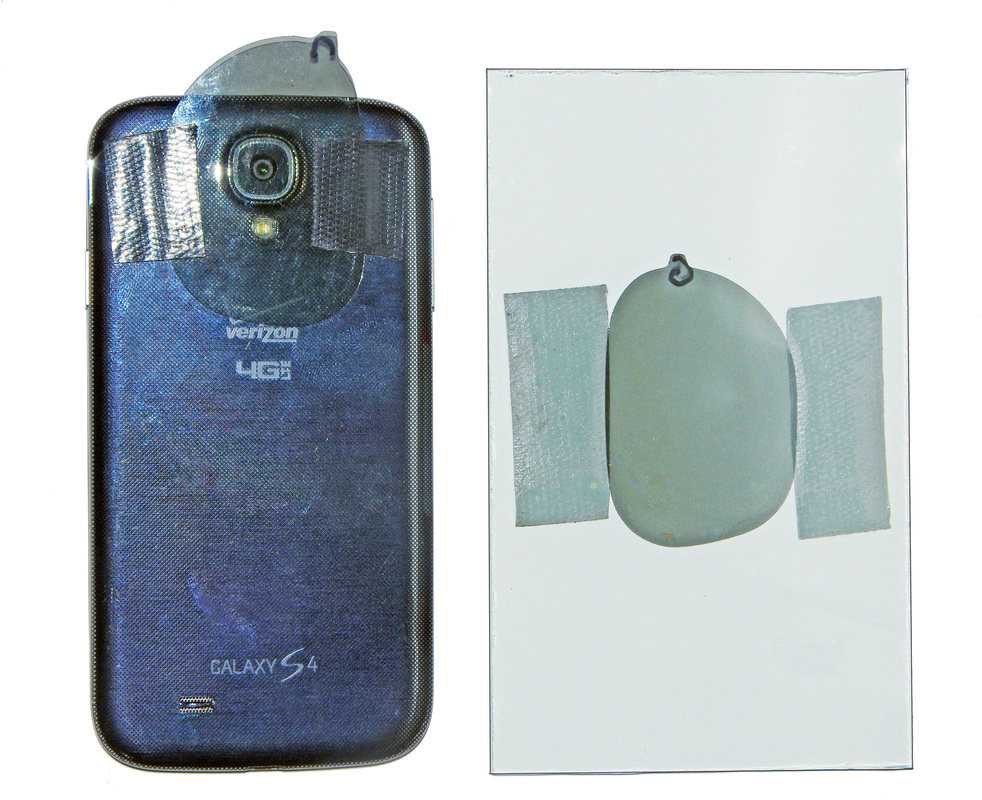
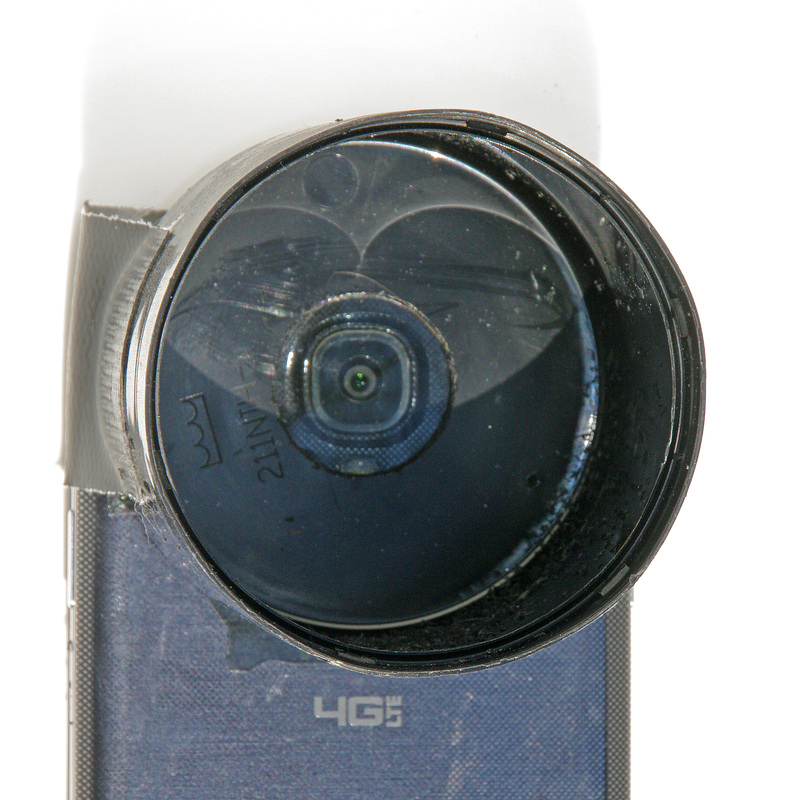
6. Get the polarizers back out and tape one of them with - the inside facing you – over the camera lens. Make sure the camera lens can see through an unblemished part of the filter. (Picture 3)
7. Tape the other filter to the bottom of the ice cream light box glass. Make sure the inside of the filter is looking up toward the inside of the filter on the camera. Inside to inside is what you want. This filter needs to be entirely unblemished. (Picture 3)
8. Tape the bucket glass to the top of the lid being careful to tape off any glass corners or edges, if they are sticking out. The polarizing filter should be centered in the lid opening and out of harm’s way on the bottom of the glass.
9. The plain bucket will diffuse light coming through its sides. To be fancy I chose to cut one side out of my square bucket then position that opening toward the sun. I also lined the bottom and three sides with white paper. (Picture 4)
10. Place the ice cream bucket out in the cold ahead of time.
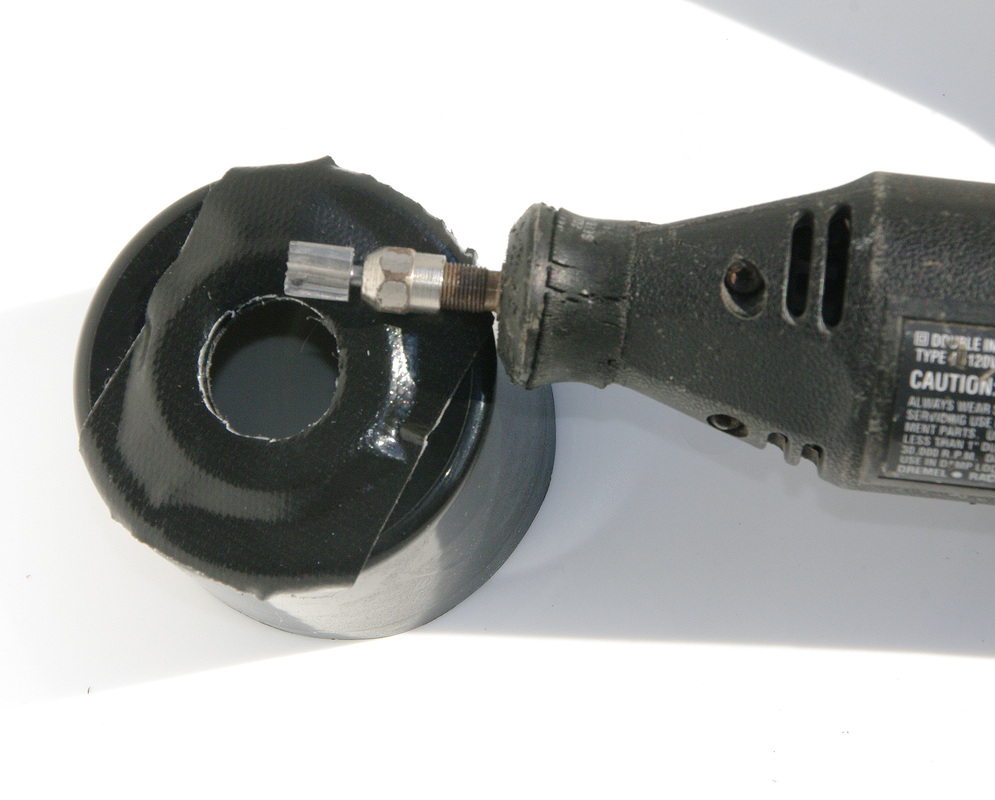
11. Now for the "lens hood" that'll hold your phone steady and at a good distance. This is how I cut a perfectly round hole in the black lid. I obtained a metal washer with a half-inch or so hole size. I stuck an oversize piece of duct tape over the washer. Then I used an Exacto knife to carve the tape out of the washer’s center. I taped the washer over the center of the top of the cap. A Dremel tool worked well for grinding all the plastic away within the center hole of the washer. (Picture 5) If I didn’t have the Dremel tool I used, I would have gone outside and used a torch to head the tip of the Exacto knife to melt through the cap. Use the Exacto knife to scrape off the burs of plastic hanging on the edges of the opening. Remove the washer.
12. Tape the top of the lid directly onto the cell phone, making sure to center the hole over the lens. Be careful, if tape sticks to the protective material over the screen of your phone, it may pull it off. (Picture 6)
-------------------------------------
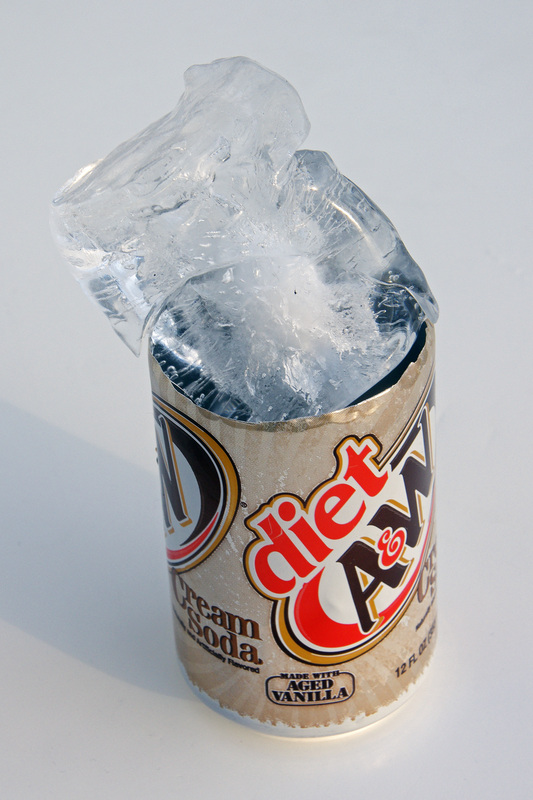
13. This part is if you want relatively bubble free water. Otherwise feel free to use water right out of the tap or a water bottle. Next, use the Exacto knife or a razor blade to carefully cut the top off an empty aluminum soda/pop can. (Picture 7)
14. Back outside now. Take the frozen bottle of water and carefully use a blade to cut the plastic from the outside. Keep the ice away from contaminants. I sawed the ends of the bottle off before I cut the plastic away.
15. Hold the bottled water ice over the top of the cut off can and melt some of the outside ice – the part that is relatively free from bubble tracks – into the can. I used a heat gun to hasten the process. A hair dryer will work but more slowly. You may only need an ounce or so to begin with. If you want bubbles, use the water right out of the bottle before you freeze it.
-------------------------------------
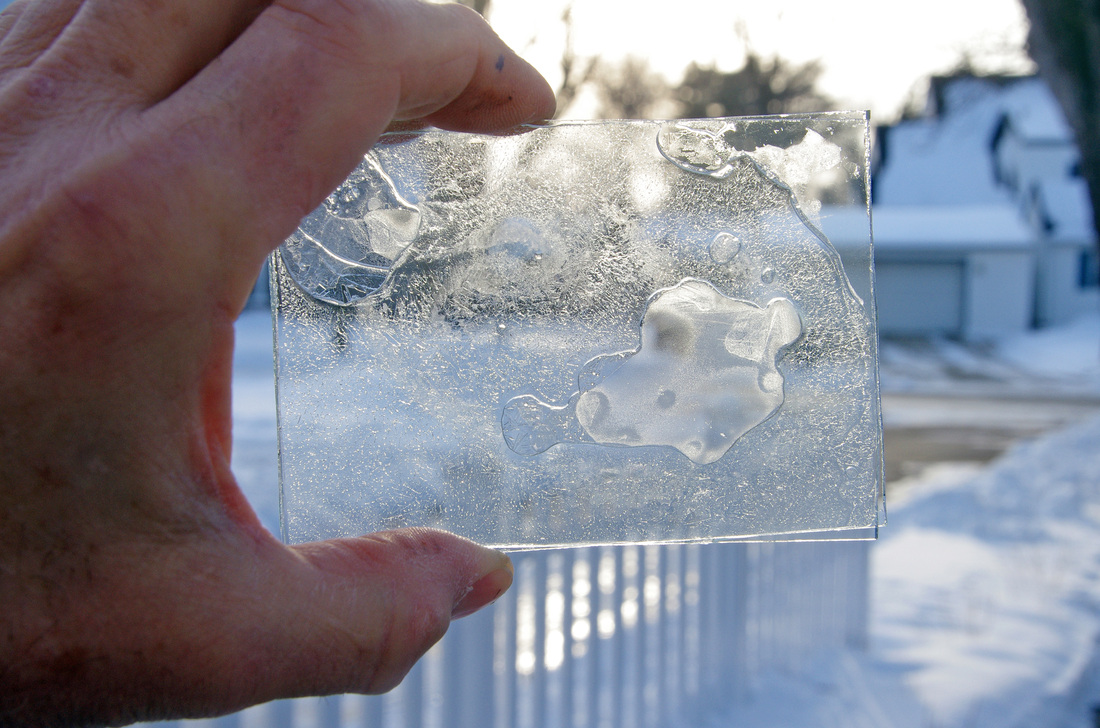
16. On the bottom of the two pieces of lint-free slabs of window glass, pour a little water from the can. At this stage I sometimes sprinkle a little coarse snow into the mix to make sure the top layer of glass does not squeeze out too much water. You need some thickness to the water. I even added a Popsicle stick at the edge of two sheets to provide a gradation of the thickness of the water. (Picture 8)
17. Let this water freeze. This can be done inside in a freezer if need be. The faster the water freezes, the smaller the crystals will be.
18. Once the water freezes, use a razor blade to scrape off any ice on the outside. Apply a little 91% rubbing alcohol to a paper towel then wipe the glass clean. (Picture 8) Dry it as well as you can. Clean off any remaining lint with a microfiber cloth.
19. Place the ice cream bucket in an area which gets a lot of light. If you have cut one side of the bucket out, orient that side toward the brightest light source.
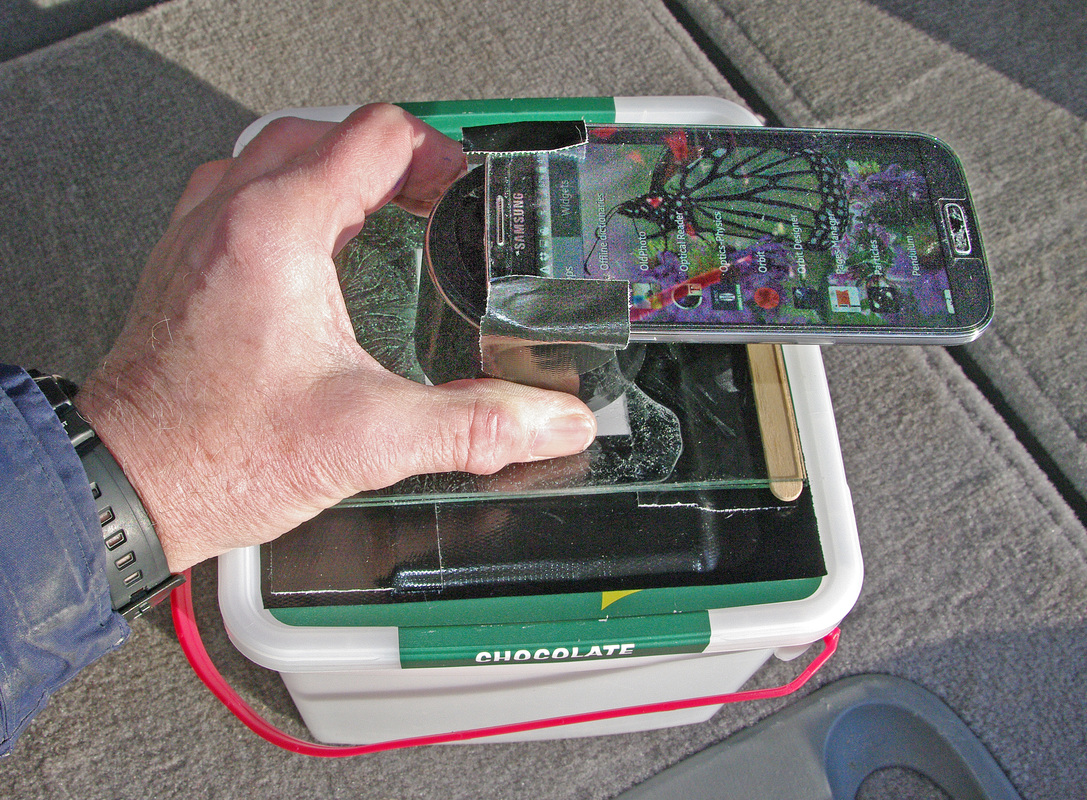
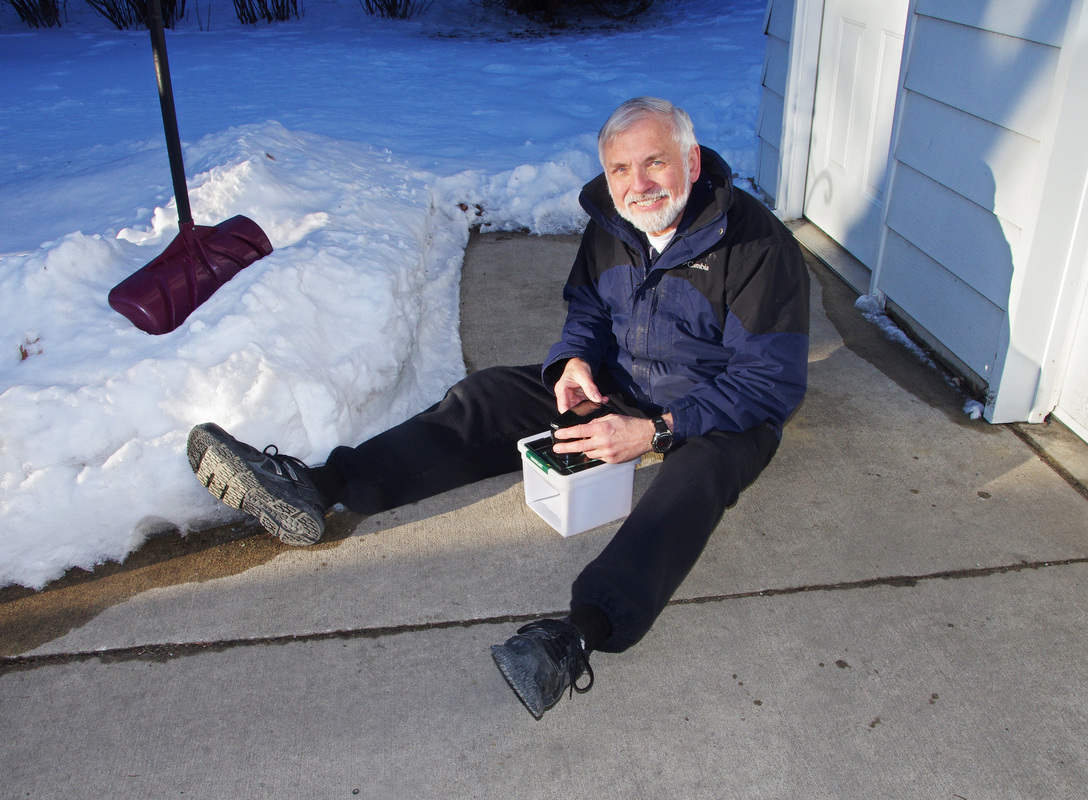
20. Set your frozen ice and glass sandwich (Picture 9) onto the stage of the ice cream bucket. At this stage I covered my head with a dark cloth and even shielded the edge of the glass sandwich so I could see the phone screen outside and to keep sunlight from illuminating any bubbles on top of the layer of ice. Start up your camera and press the black lid against the glass sandwich. Look around and rotate the sandwich until you find good color and patterns. I was out on the driveway and out of necessity set the bucket down between my legs and draped a black coat over my head and the bucket – except on the side where the light is shining in. By the way, wearing Polaroid sunglasses at this point will help to see the colors and patterns without the camera. (Pictures 10 & 11 & 12)
21. Set your camera on close-up photography mode (I have a Samsung S4 and I had to use the “Optical Reader” app to do this close of focusing reliably) and press the black cap phone combination to the glass stage. Make sure the image is composed and in focus when you take the picture. You may have to zoom in a little bit to cover the whole image area with the Polarizing filter under the stage; or crop the image later. Yours truly.
I hope you enjoy birefringence!
Click HERE to go directly to the gallery of cell phone images or HERE to see the high resolution images I captured using my digital SLR.
One day as I was freezing my butt off one night out in my cold garage taking super close-up pictures of snowflakes I thought about how I might improve on my pictures of frozen bubbles. Sometimes I’d see some iridescence in the feather-like crystals which led me to think that maybe the color might be enhanced by birefringence. If so two polarizing filters - one in front and one behind the bubble - might create brighter colors. I tried it and ..... nothing. No extra color at all. Nuts. Apparently the crystals are too thin. But I wondered if frost on a window might be thicker and thus work. So I dribbled a little water on glass and, low and behold, what I saw then was magnificent! Even though frost was still too thin a thicker - 1 mm or so - layer of crystallized water IS birefringent!! REALLY BIREFRINGENT! The colors and patterns can be fantastic! And it turns out it's easy to create a set-up to observe it and photograph it using a cell phone camera.
Birefringence is a fancy word used to describe a phenomenon that is made visible when a birefringent material is placed between two polarizing filters – especially when the filters are “crossed” so that essentially no light gets through, except for certain wavelengths that are interfered with by the birefringent material. And ice – when in the range of a certain thickness – does a great job of interfering with the light, I discovered. Of does it ever! The thickness and orientation of the ice crystals and the degree to which the two polarizers are crossed play into what colors get through to the observer.
I already had been using a set-up for taking pictures of snowflakes using back-lighting, and I tried using it to capture the colors of birefringence of ice. It worked spectacularly well! Then I worked out a simple way to take great pictures with my cell phone.
However, to create really high resolution pictures at high magnification, I worked out a technique over a two month period. Trust me, I froze half to death this winter. On this particular website I start out with the cell phone images then I show off the best stuff I took using a macro lens and high magnification.
So, I did the 'figuring out' part for you all. Making the ice crystals is easy, just use the freezer part of your refrigerator -or- if it’s as cold there as it has been here in Iowa this winter, simply place your thin layer of water outside for a bit.
-------------------------------------------------------------------------
How to Guide
Now for the info about how you can take pictures of birefringent ice with a cell phone.
Materials I used
1. Two polarizing filters: the ones I used were taken from a pair of RealD 3D glasses that I opted not to recycle after watching a 3D movie at the theater.
2. One bottle of drinking water. Actually even tap water or snow will work.
3. One removable black cap from a spray can of some sort. It should be a cap that is simple and completely hollow.
4. Optional: one a metal washer with about a half inch hole in the center.
5. Duct tape, preferably black.
6. One razor blade and an Exacto knife.
7. Window glass. Pairs of pieces around 3 x 5 inches, or larger, depending upon your "light box" design. One piece of glass will fit into or onto the lid of a gallon ice cream container.
8. One white one-gallon ice cream bucket. I used a square one.
9. One bottle of ordinary window cleaner.
10. One bottle of 91% rubbing alcohol.
11. One roll of paper towels.
12. One microfiber cloth – or some other material that will not leave fibers behind.
13. One sharpie type permanent marker.
14. Optional: a Dremel tool that can be used to make a hole in the black can cap or a flame that will heat the Exacto blade enough to melt through the plastic.
15. One hair dryer or better yet, a heat gun.
16. A few sheets of white paper; any weight.
17. One empty aluminum soda/pop can.
18. One black cloth or coat that you can cover yourself with to make it possible to see the phone screen in bright light.
19. A day outside that is below freezing. A refrigerator freezer will harden the ice but unless it’s a floor model big enough to take pictures down inside of it, you will probably have to wait to winter to do this. I suppose dry ice could be used to create enough cold even in the warm months.
-------------------------------------------------------------------------
Instructions: this is what I did to set up for the cell phone images
1. First of all if I wanted water with few bubbles I froze the water and later melted the relatively bubble free outer part of the bottle of ice to get the little bit of airless water I needed. As the ice freezes the air is mostly released in the last part to freeze, i.e. in the inner part. I found boiling to be ineffective at removing the air.
2. Now disassemble a pair of RealD 3D glasses – the modern polarizing type that are used in the theaters. (See picture 1 in the gallery below) You will want to keep track of which side of each filter is on the inside. Maybe stick a small piece of tape onto or somehow mark the edge of the inside of each filter. Free the “lenses” by snapping off the bows then twisting the frame at the middle. In this way you can pry the frame apart without crimping the filters. Set the filters aside for now.
3. Construct the “light chamber” by using the one-gallon ice cream bucket. It will provide a diffused white light to shine through the ice crystals. (Picture 2) [NOTE! At this point, in green font, my instructions do not exactly follow the light bucket design I actually used and took pictures of for this webpage. What I’m telling you to do now is a better design that my first one.]
4. In the center of the lid of the ice cream bucket, mark out then cut a hole that is a about an inch on all sides larger than one of the 3D glasses filters. (Picture 2)
5. Cut a piece of glass so that the corners of the glass extend to the edge of the lid. If the sharp corners are exposed, tape them off. Also cut several pairs of smaller pieces that you will form ice between. Make them 3 x 5 inches or so. Clean all the pieces of glass with window cleaner, paper towels and finally, a microfiber cloth.
6. Get the polarizers back out and tape one of them with - the inside facing you – over the camera lens. Make sure the camera lens can see through an unblemished part of the filter. (Picture 3)
7. Tape the other filter to the bottom of the ice cream light box glass. Make sure the inside of the filter is looking up toward the inside of the filter on the camera. Inside to inside is what you want. This filter needs to be entirely unblemished. (Picture 3)
8. Tape the bucket glass to the top of the lid being careful to tape off any glass corners or edges, if they are sticking out. The polarizing filter should be centered in the lid opening and out of harm’s way on the bottom of the glass.
9. The plain bucket will diffuse light coming through its sides. To be fancy I chose to cut one side out of my square bucket then position that opening toward the sun. I also lined the bottom and three sides with white paper. (Picture 4)
10. Place the ice cream bucket out in the cold ahead of time.
11. Now for the "lens hood" that'll hold your phone steady and at a good distance. This is how I cut a perfectly round hole in the black lid. I obtained a metal washer with a half-inch or so hole size. I stuck an oversize piece of duct tape over the washer. Then I used an Exacto knife to carve the tape out of the washer’s center. I taped the washer over the center of the top of the cap. A Dremel tool worked well for grinding all the plastic away within the center hole of the washer. (Picture 5) If I didn’t have the Dremel tool I used, I would have gone outside and used a torch to head the tip of the Exacto knife to melt through the cap. Use the Exacto knife to scrape off the burs of plastic hanging on the edges of the opening. Remove the washer.
12. Tape the top of the lid directly onto the cell phone, making sure to center the hole over the lens. Be careful, if tape sticks to the protective material over the screen of your phone, it may pull it off. (Picture 6)
-------------------------------------
13. This part is if you want relatively bubble free water. Otherwise feel free to use water right out of the tap or a water bottle. Next, use the Exacto knife or a razor blade to carefully cut the top off an empty aluminum soda/pop can. (Picture 7)
14. Back outside now. Take the frozen bottle of water and carefully use a blade to cut the plastic from the outside. Keep the ice away from contaminants. I sawed the ends of the bottle off before I cut the plastic away.
15. Hold the bottled water ice over the top of the cut off can and melt some of the outside ice – the part that is relatively free from bubble tracks – into the can. I used a heat gun to hasten the process. A hair dryer will work but more slowly. You may only need an ounce or so to begin with. If you want bubbles, use the water right out of the bottle before you freeze it.
-------------------------------------
16. On the bottom of the two pieces of lint-free slabs of window glass, pour a little water from the can. At this stage I sometimes sprinkle a little coarse snow into the mix to make sure the top layer of glass does not squeeze out too much water. You need some thickness to the water. I even added a Popsicle stick at the edge of two sheets to provide a gradation of the thickness of the water. (Picture 8)
17. Let this water freeze. This can be done inside in a freezer if need be. The faster the water freezes, the smaller the crystals will be.
18. Once the water freezes, use a razor blade to scrape off any ice on the outside. Apply a little 91% rubbing alcohol to a paper towel then wipe the glass clean. (Picture 8) Dry it as well as you can. Clean off any remaining lint with a microfiber cloth.
19. Place the ice cream bucket in an area which gets a lot of light. If you have cut one side of the bucket out, orient that side toward the brightest light source.
20. Set your frozen ice and glass sandwich (Picture 9) onto the stage of the ice cream bucket. At this stage I covered my head with a dark cloth and even shielded the edge of the glass sandwich so I could see the phone screen outside and to keep sunlight from illuminating any bubbles on top of the layer of ice. Start up your camera and press the black lid against the glass sandwich. Look around and rotate the sandwich until you find good color and patterns. I was out on the driveway and out of necessity set the bucket down between my legs and draped a black coat over my head and the bucket – except on the side where the light is shining in. By the way, wearing Polaroid sunglasses at this point will help to see the colors and patterns without the camera. (Pictures 10 & 11 & 12)
21. Set your camera on close-up photography mode (I have a Samsung S4 and I had to use the “Optical Reader” app to do this close of focusing reliably) and press the black cap phone combination to the glass stage. Make sure the image is composed and in focus when you take the picture. You may have to zoom in a little bit to cover the whole image area with the Polarizing filter under the stage; or crop the image later. Yours truly.
I hope you enjoy birefringence!